
Custom Sportster XLST3 by Shaw Speed & Custom (work in progress)
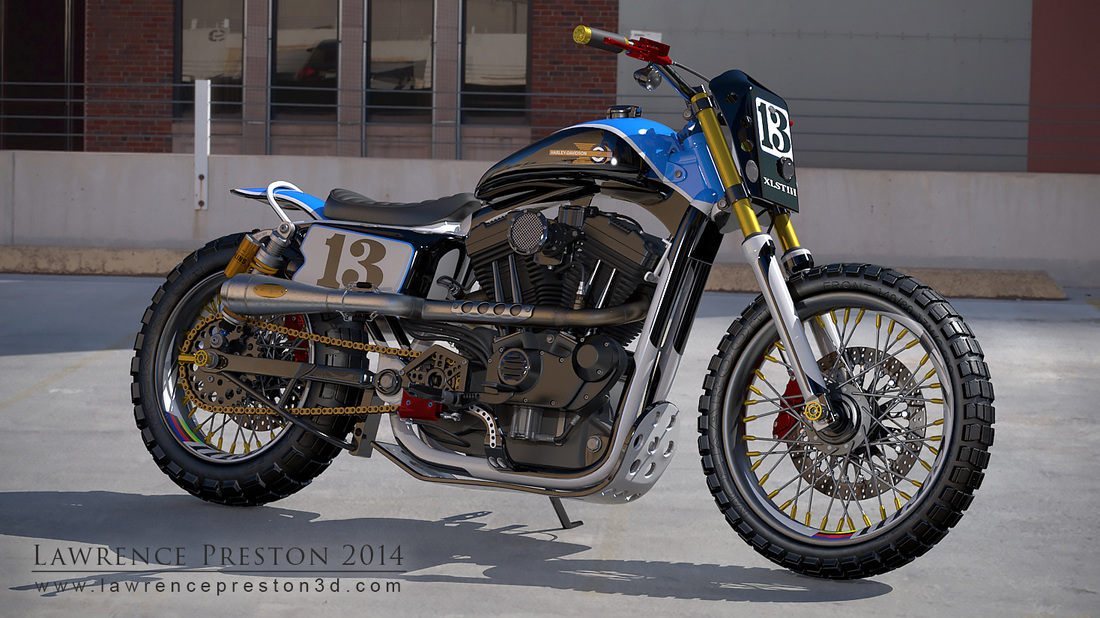
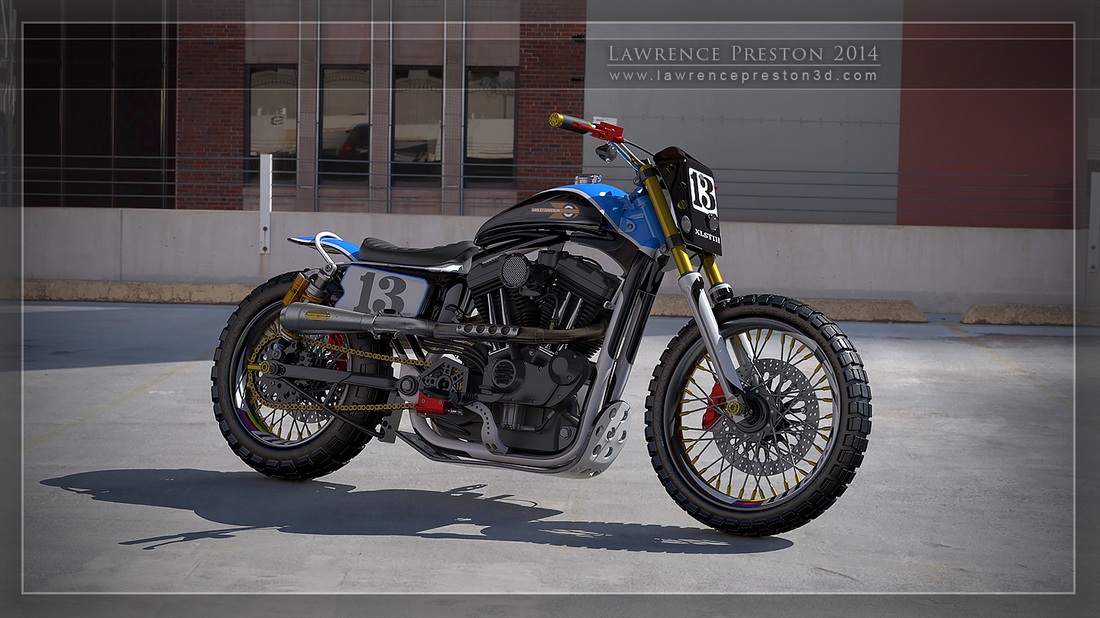
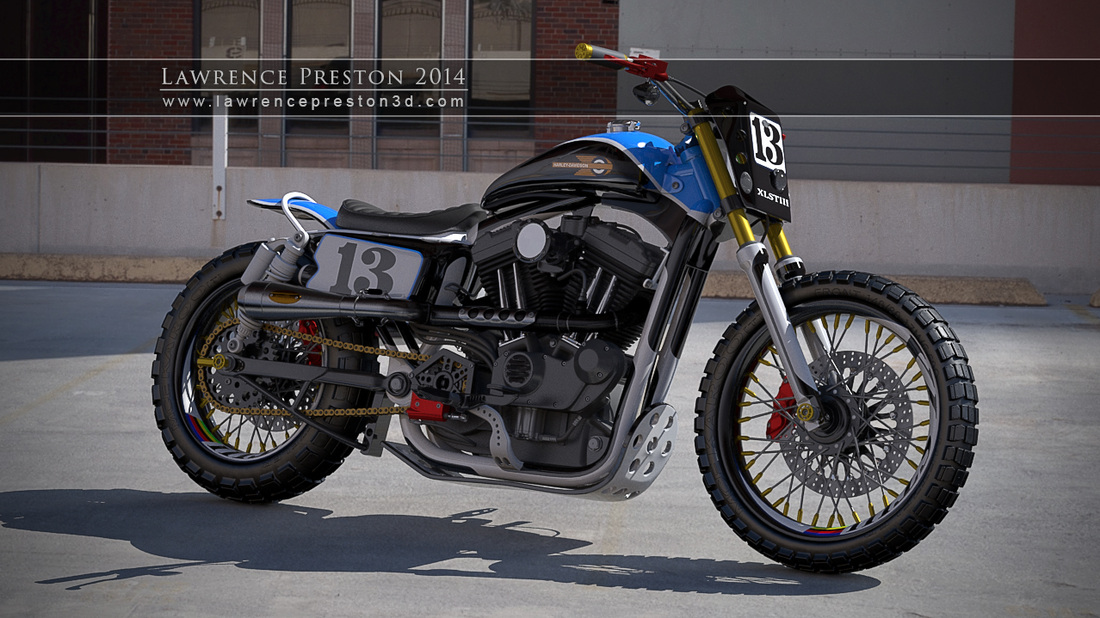
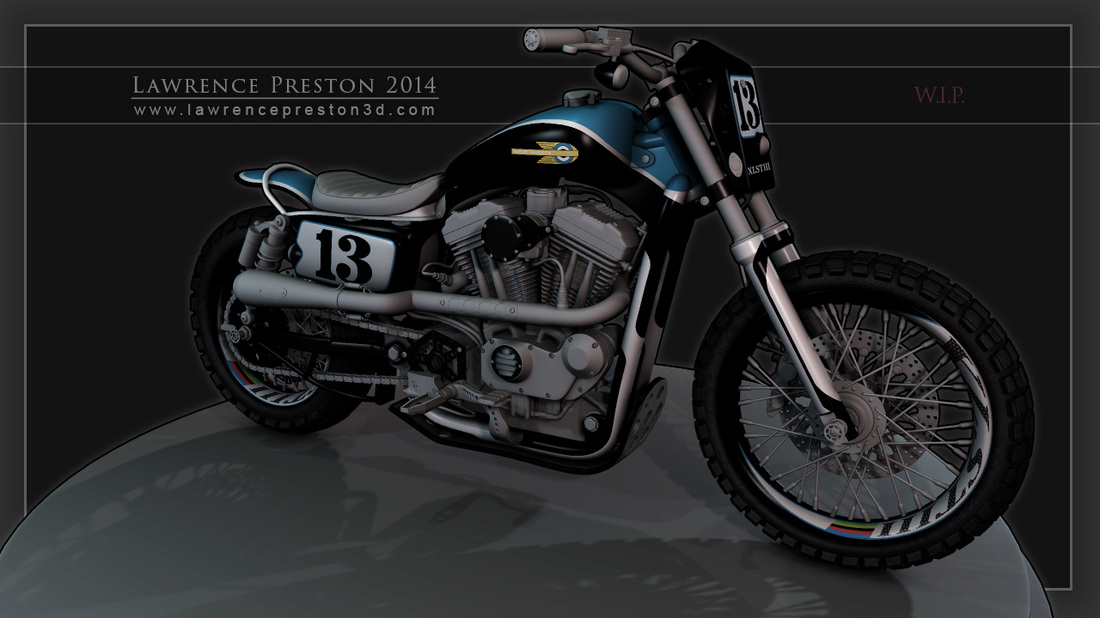
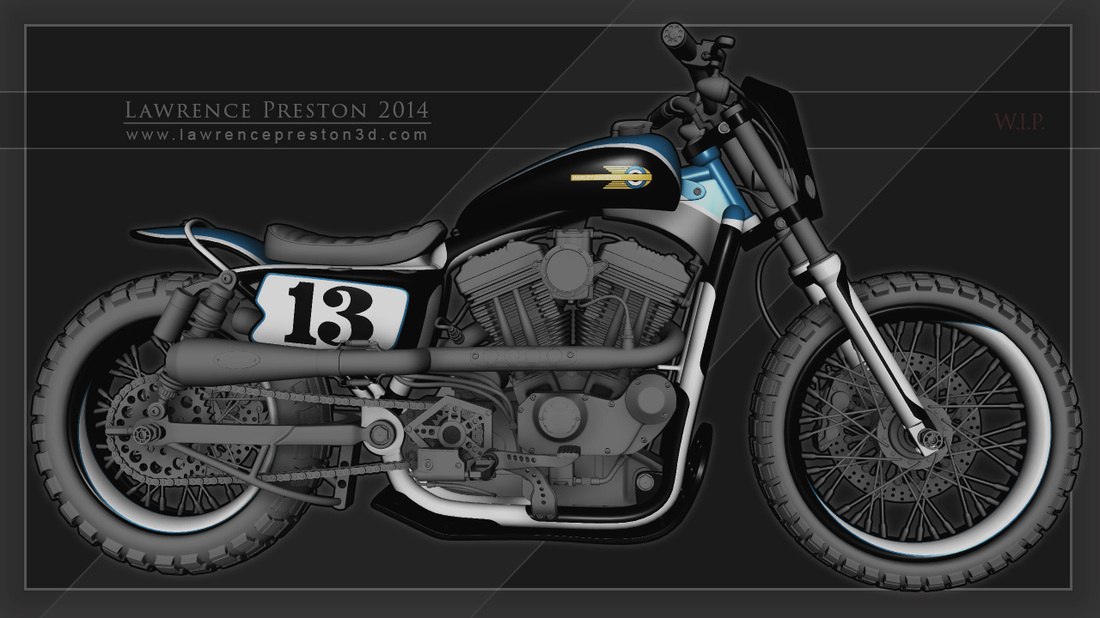
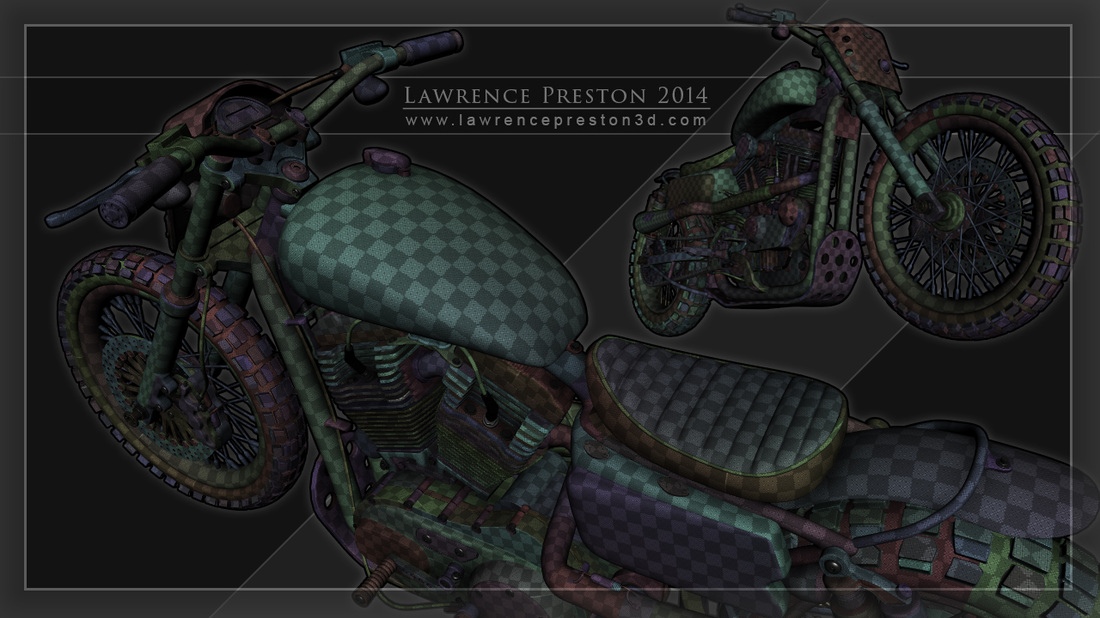
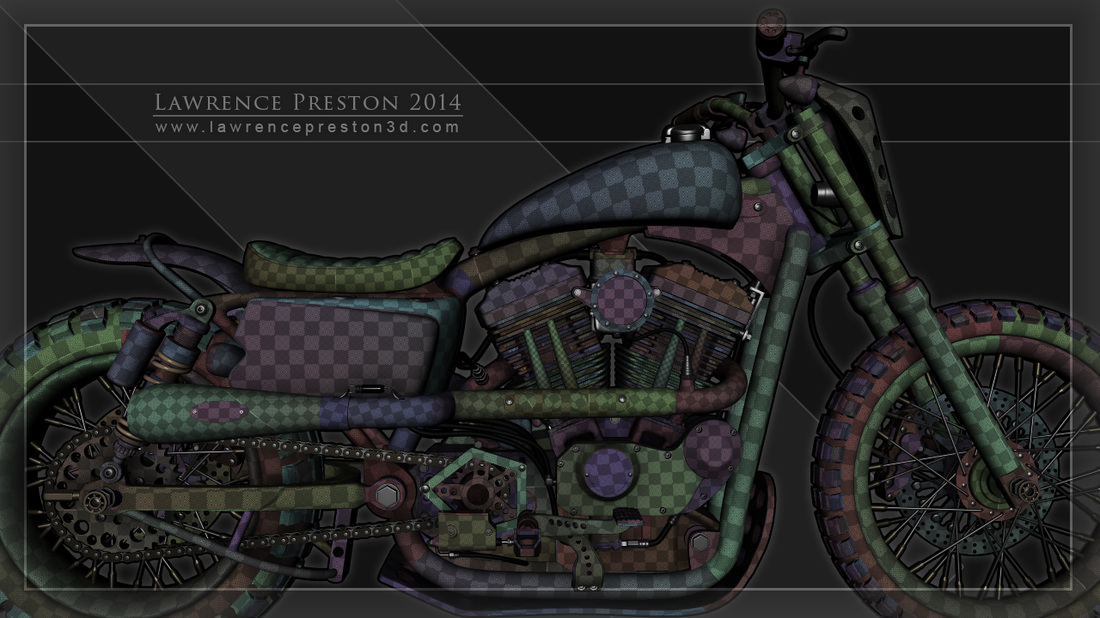
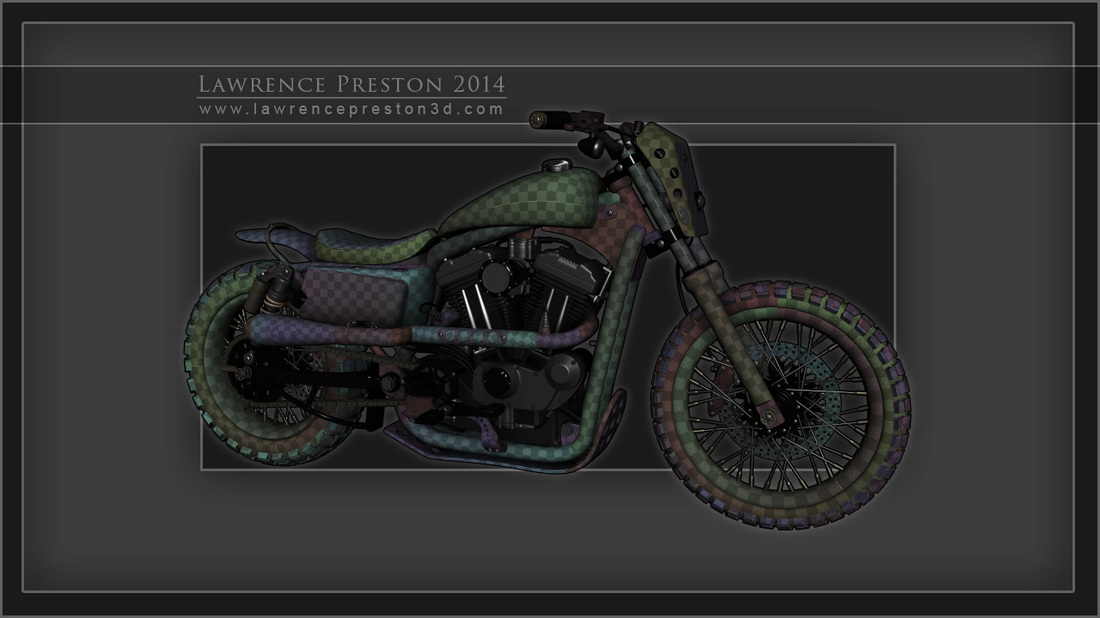
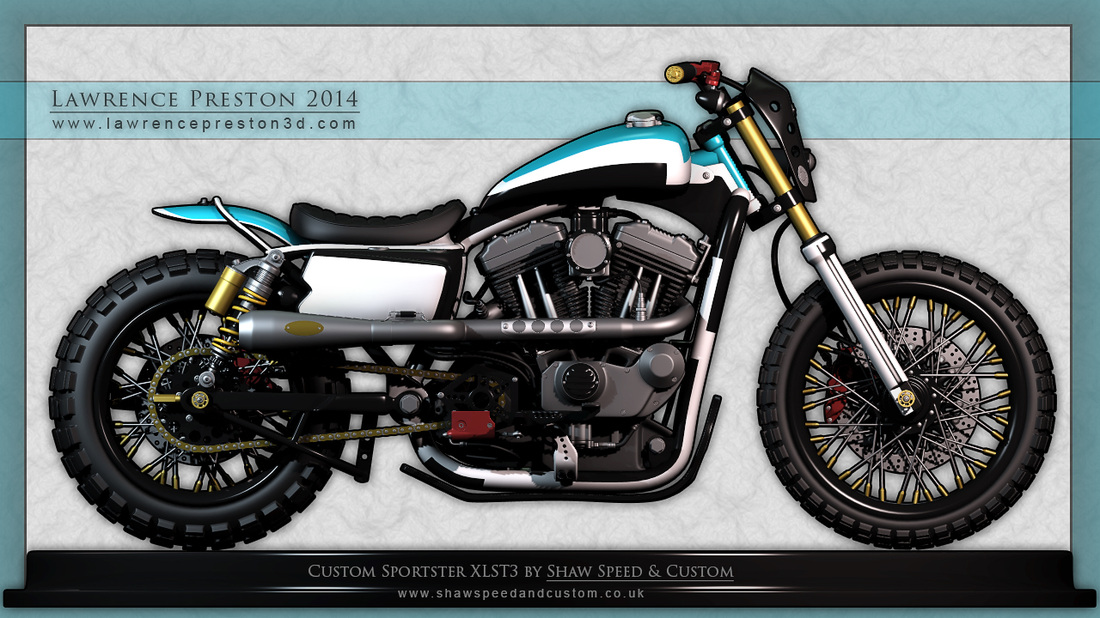
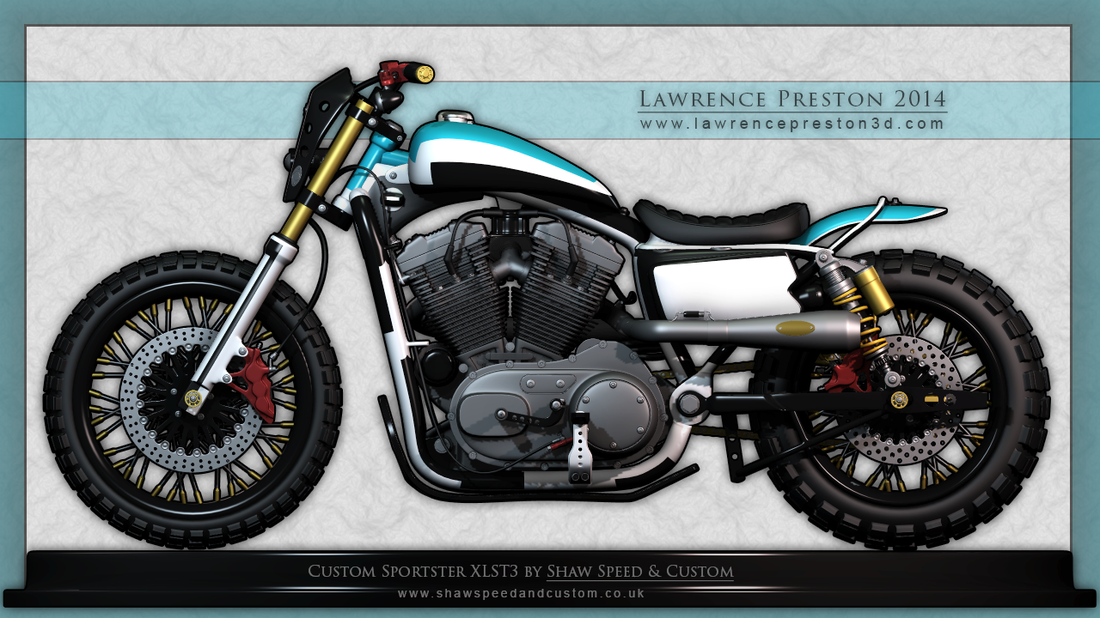
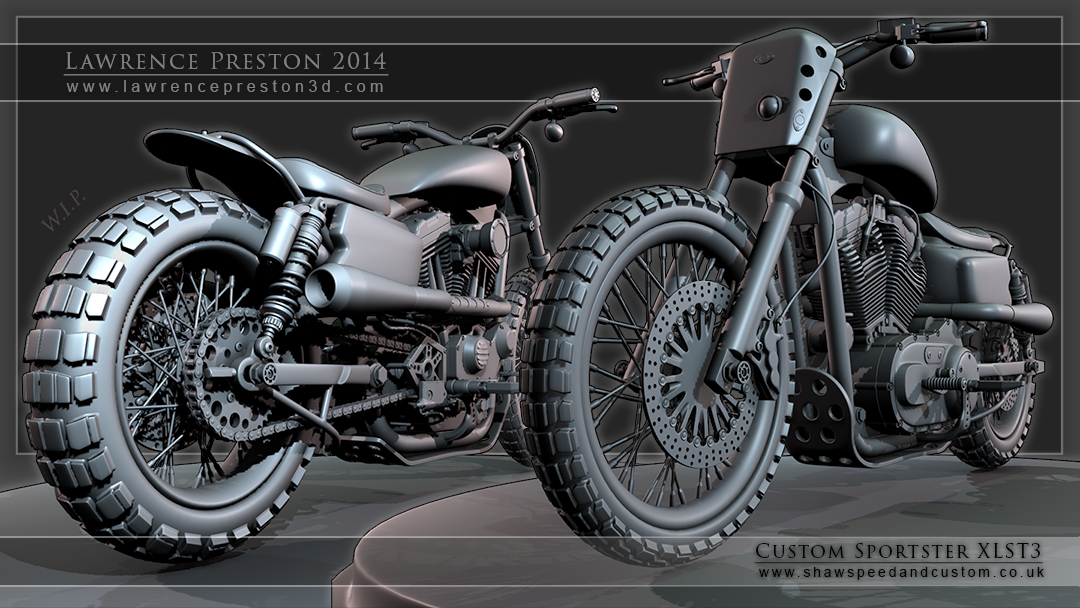
November 3, 2014 Day 35b: I decided to ditch the funky background. Once the novelty wore off, it just seemed like bad compositing. I also went back to a more telephoto lens as the wide angle gave too much perspective. Added a little fill light to five some specular highlights. I textured a few more pieces: the disk brake routers, the levers and master brake master cylinders, and foot pegs. I finally got the exhaust pipe under control. Turns out that I didn't have the normal map assigned to linear. I'm using a linear workflow, which is pretty new to me, and I overlooked it. It has been giving me funky shading issues for a long time and I was really confused. If you look back, you will see what I mean. It's still not perfect, but good enough where I think I can leave it be for a while, and move on.
|
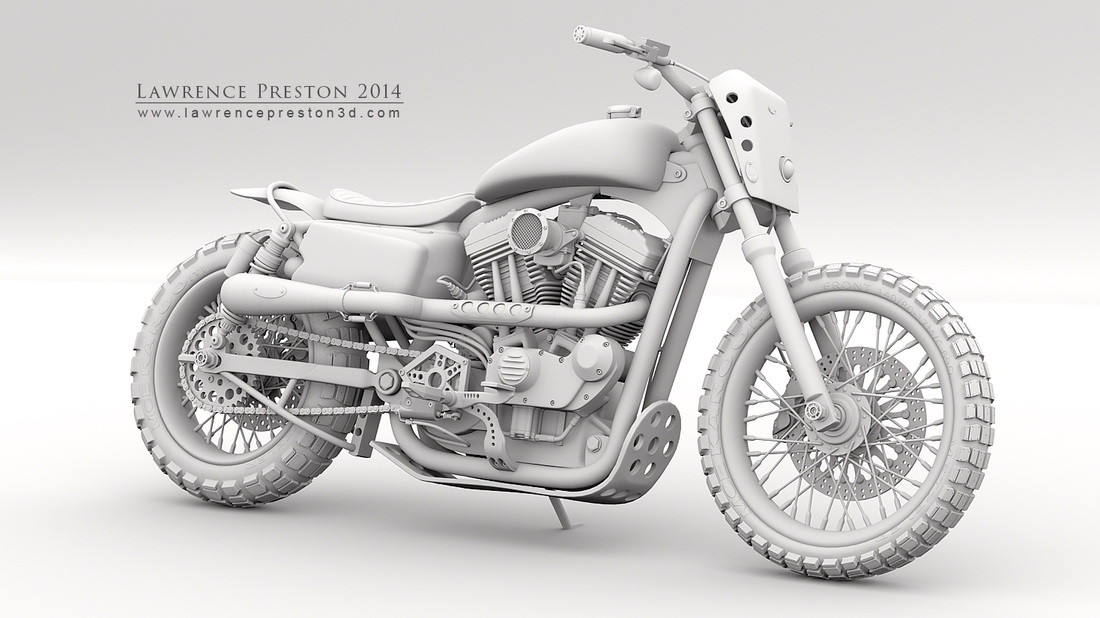
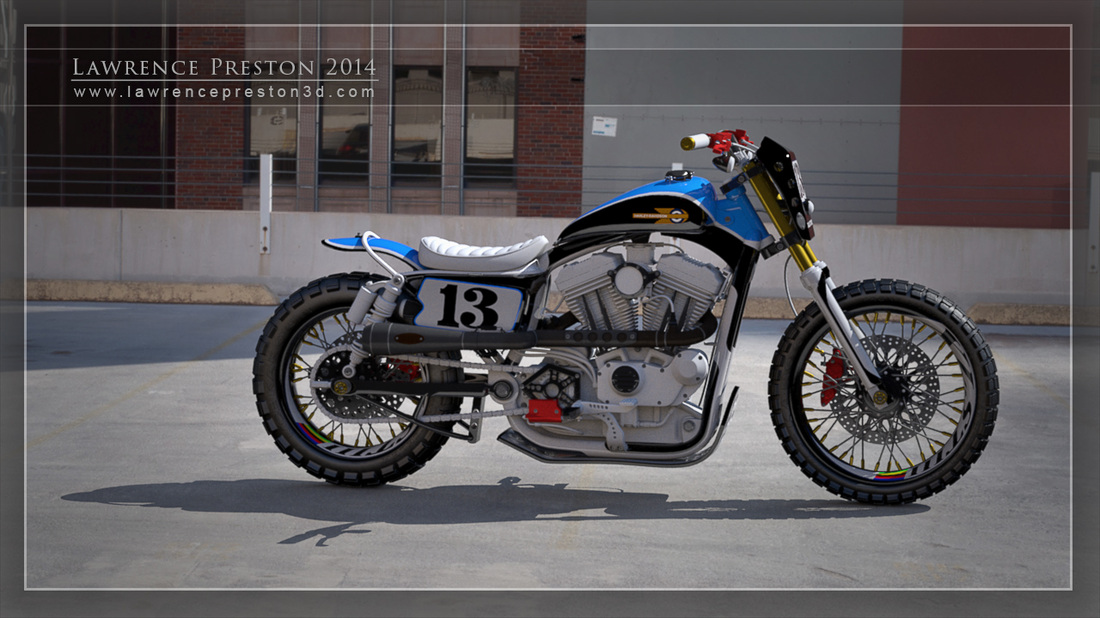
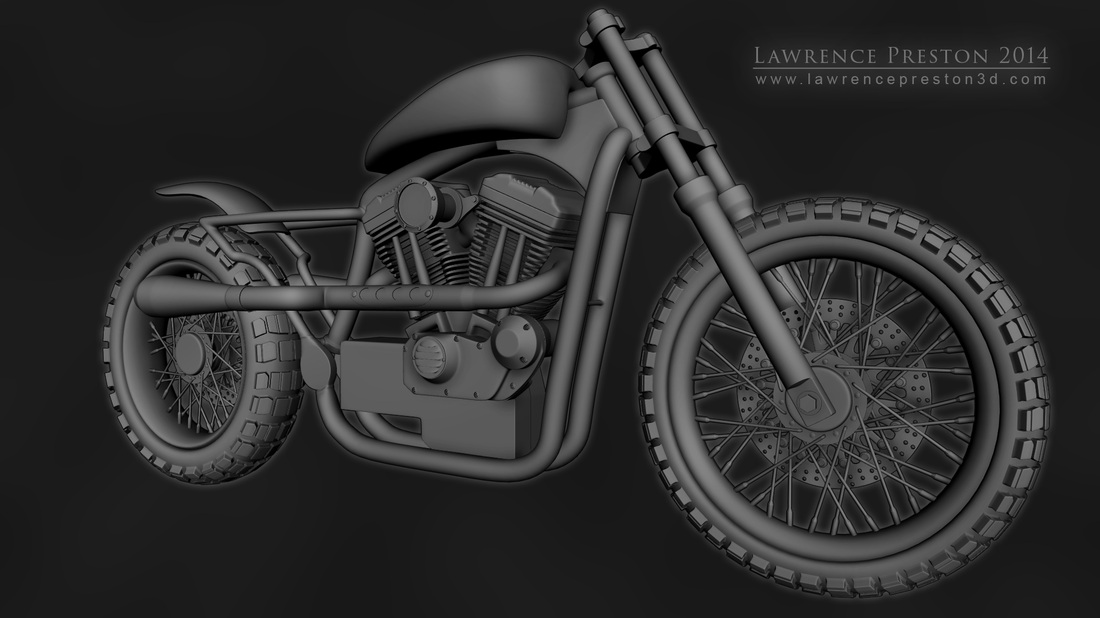
November 3, 2014 Day 35a: Obligatory ambient occlusion render
|
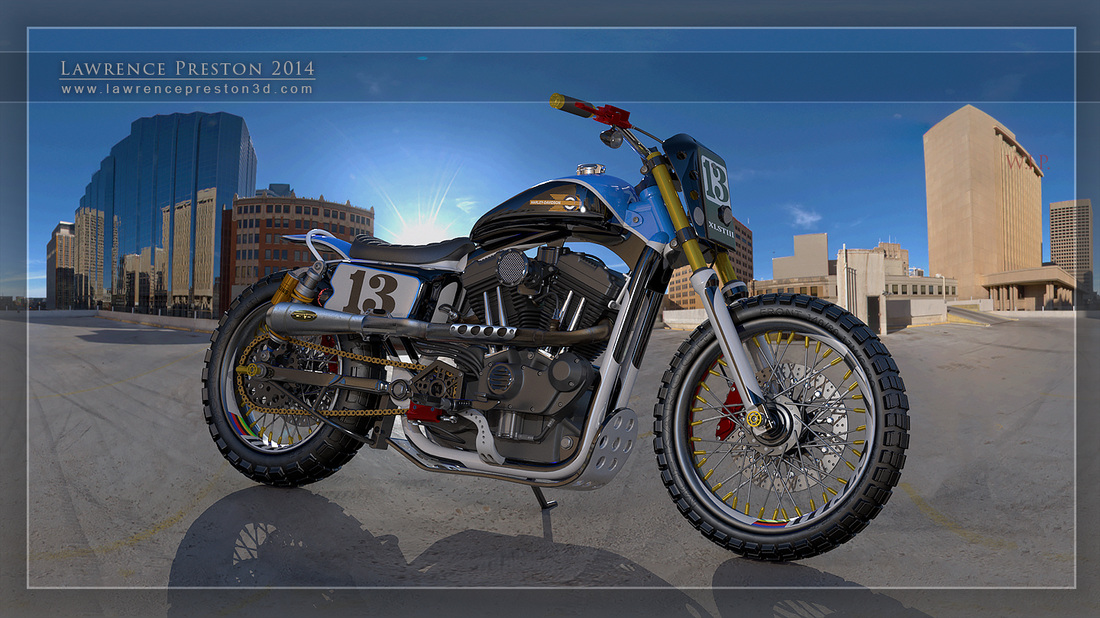
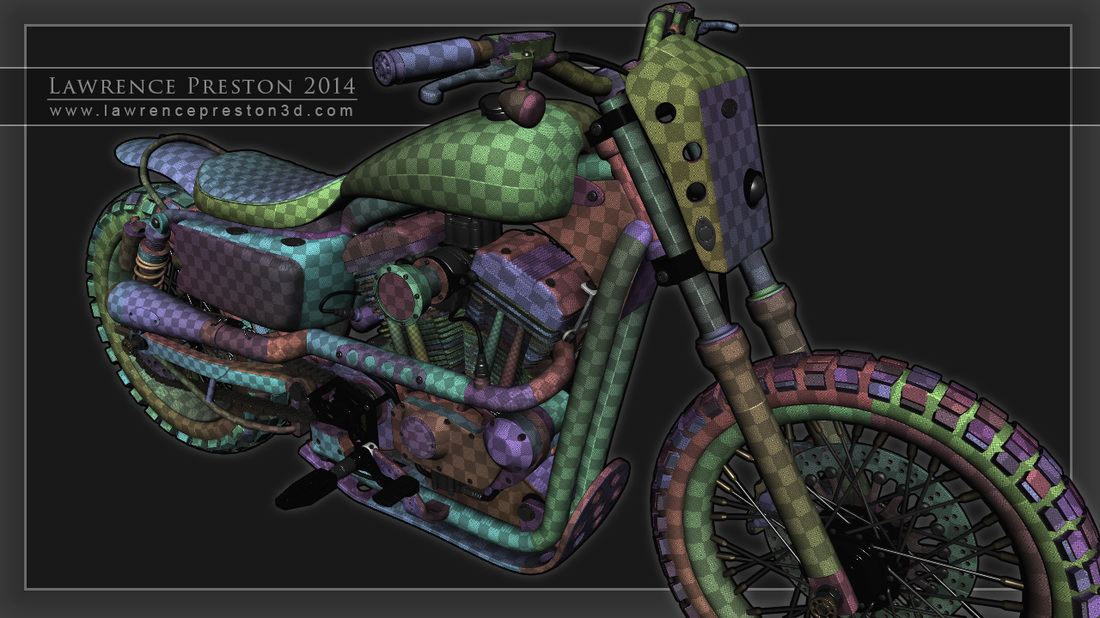
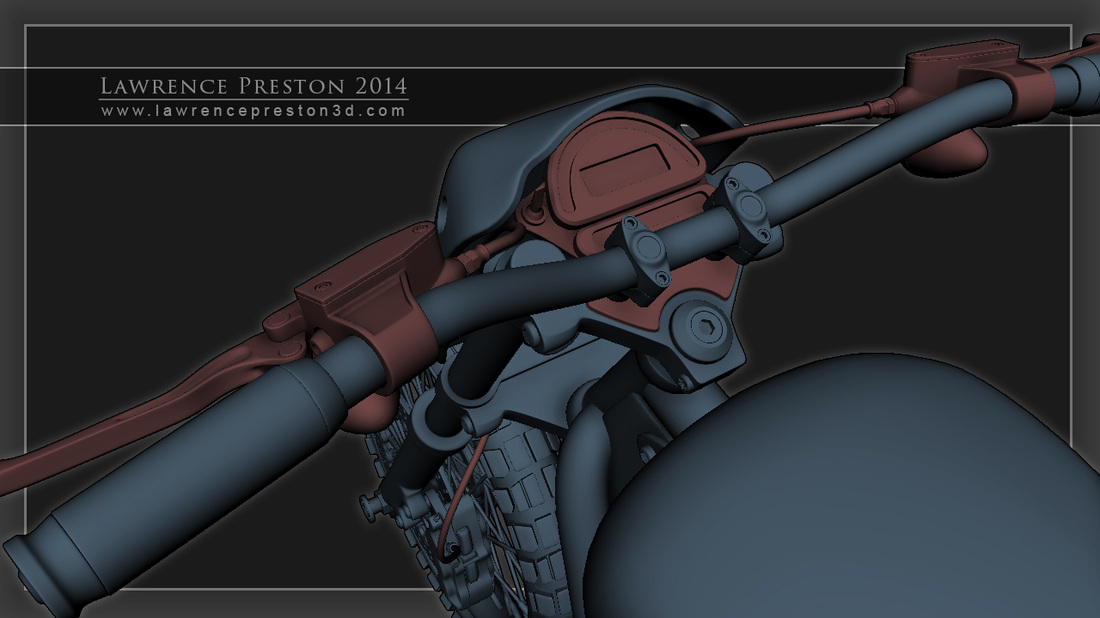
September 21, 2014 Day 34: finished up the details on the brake/cluch levers, master cylinders. and calipers. Getting really tedious, so I started playing around with the lighting, again. While trying to add a new reflection map, I accidently, swapped out the image I was using for the background and matte/shadow shaders. I thought that the effect was interesting, so I started playing. It's an impossible result, and as such, I kind of like it. It's an extreme fish-eye/panoramic background, but the bike is in a more standard perspective, yet it doesn't look as out of place as it would seem ( at least I think it doesnt) Anyhow, I like the effect so I've been playing with it to match the lighting as best I can. Also, to compensate for the harsh back lighting, I'm trying to emulate a fill light, which hopefully will solve some of the lost detail issues in the front. Probably will not be the final position/background, but I like the direction. Temp kickstand added because it's been bugging some people, lol
|
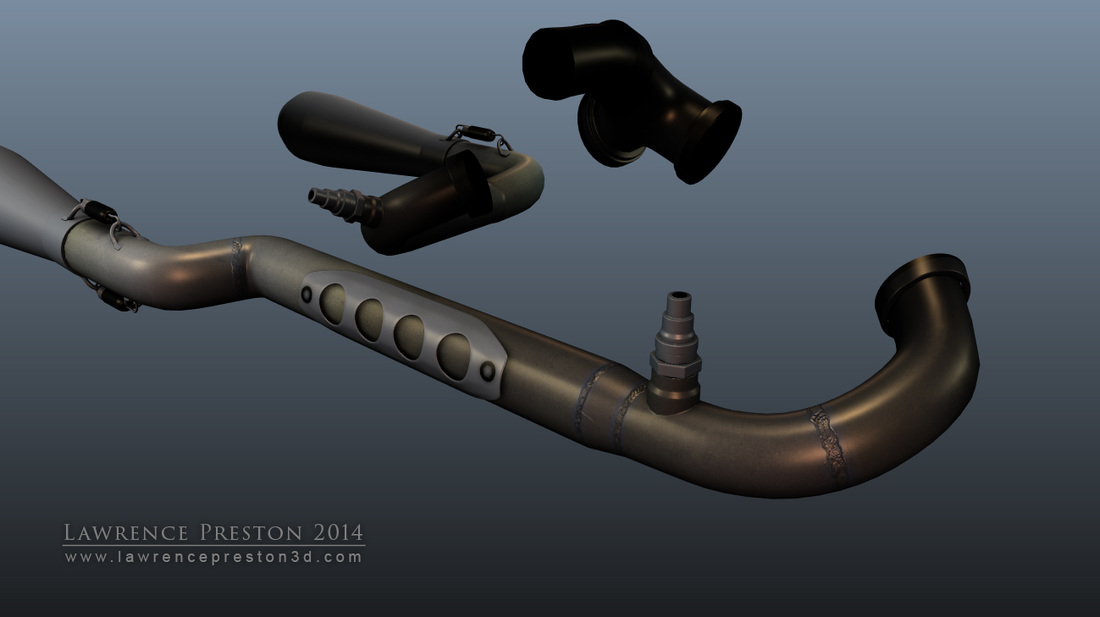
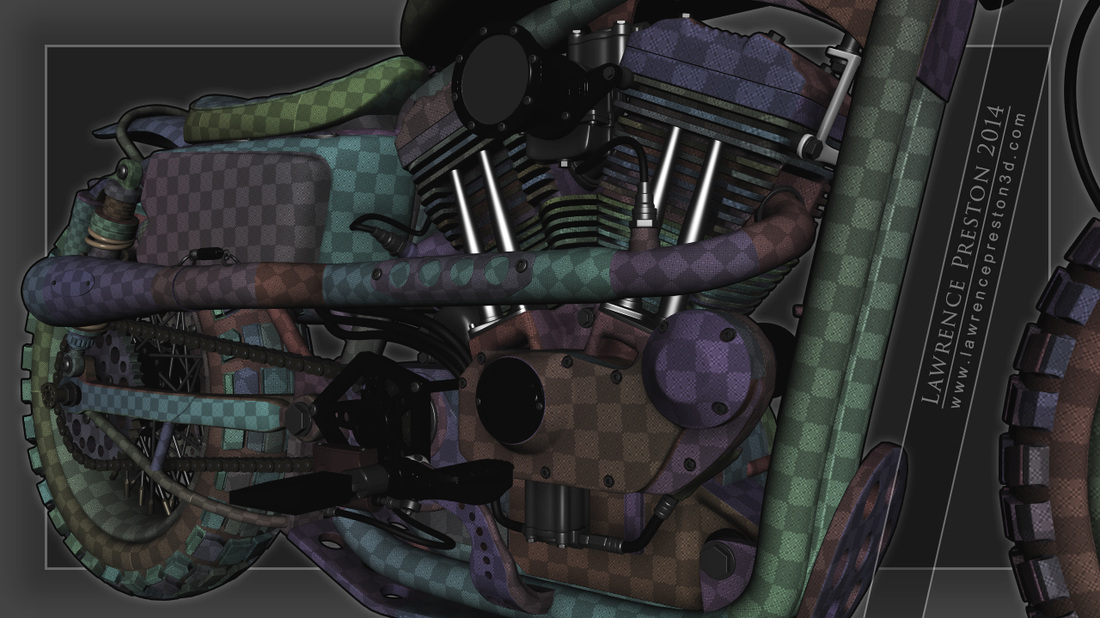
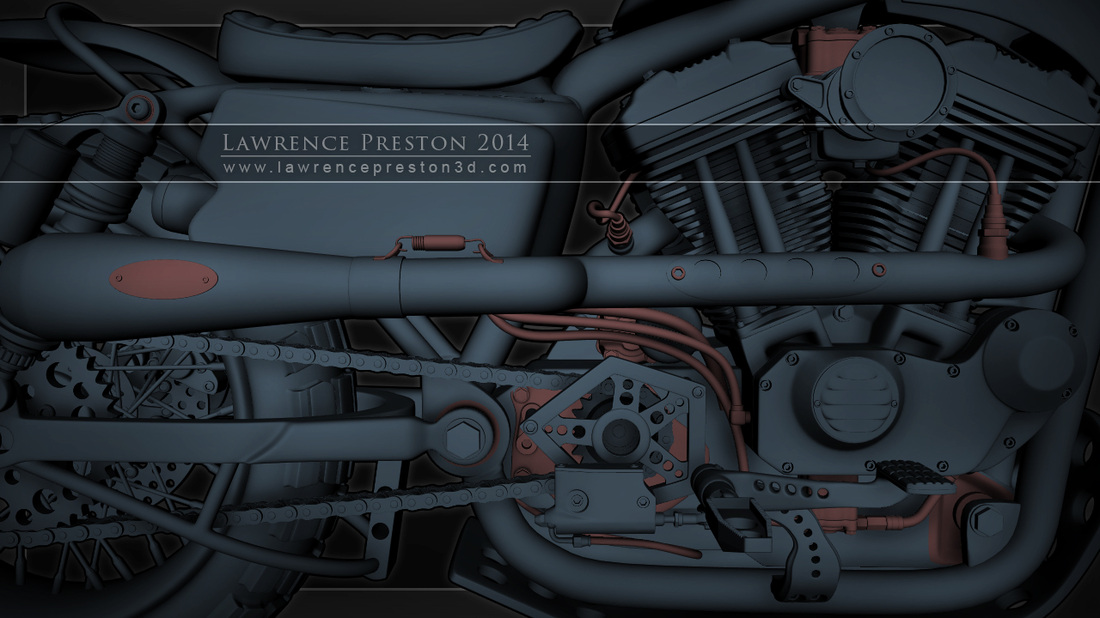
September 14, 2014 Day 33c: Last update for the night. Getting near the end, now. I redid the exhaust, for the n-teenth time, and am still not happy with it. It's definitely going to be the hardest part of the this project. Still way to shiny, and not enough variation. trying out different things. Used a, straight-up, cloth procedural right out of Maya for the grill on the intake. Came out really well, I think. Getting a feel for transparent materials for the light covers (never worked with transparent materials before). Seems like the texture I put behind them are going to give them the realism they need (pretty blah looking, atm). I'll also need to put a normal or bump, on the transparencies, to emulate the shape so I'm curious if that will work, or what will happen. If not, I'll have to remodel them to include the texture that I need.
|
September 14, 2014 Day 33b: Incredible, I was able to texture this in dDo in under an hour. The hardest part was figuring out how to get the writing on the cylinder. I probably did it completely wrong, but I was able to get it to work. Navigating the file structure, of dDo is a bit daunting, if you are doing it manually. Worked out great, though. Now, unfortunately, It needs to go back into Maya, where I'll make it look like poop, even though the render times are up at about 10 minutes. Still baffled that a real time render, like this can do such an incredible job.
|
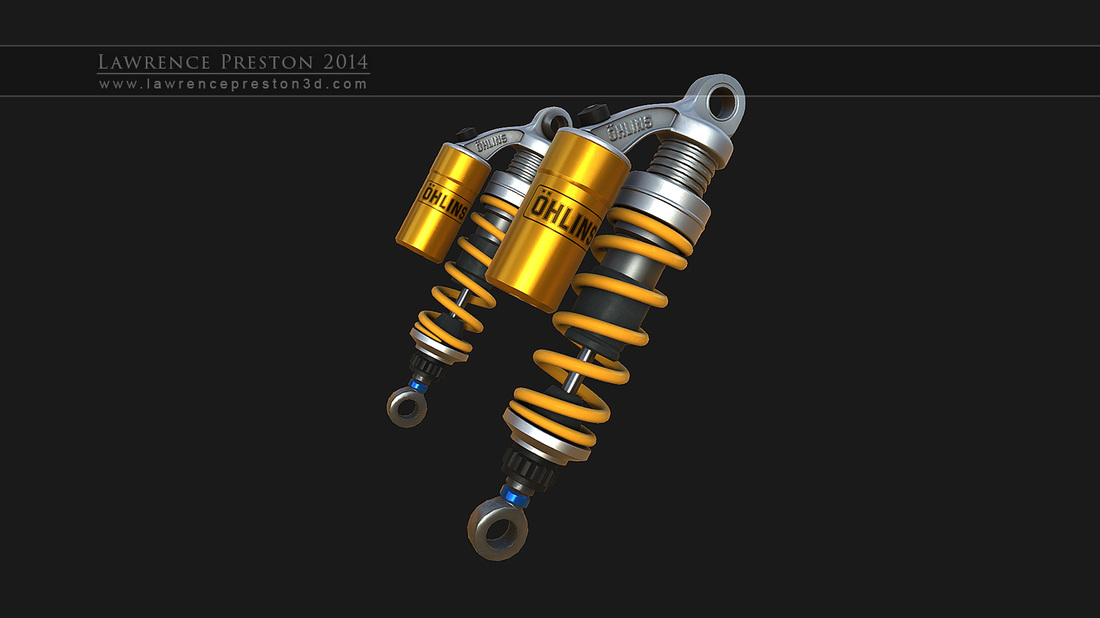
September 14, 2014 Day 33a: Playing with Quixel's dDo. Rear shocks all prepped and ready to go. I wish I could get the renders to look this good in Maya. I've been trying, but everything looks so awesome in dDo, which, I believe, uses Marmoset Skyshop lighting. These are the shocks with just a base coat down. I made a color map (for material separation, in Maya. an AO, and object spaced normals in xNormal. I used Quixel's nDo2 for the normal information (just the lettering, and ridge on the top). The UV's were unwrapped in UV Layout, and ironically, they were layed out in Maya, lol.
|
|
September 11, 2014 Day 31-32: Still struggling along with using Mental Ray materials. Found out that I CAN use specular and gloss maps with mia materials. Getting a feel for how the specularity, gloss, and reflections interplay with each other. I'm also trying to figure out where actual texture maps are needed and where they are not. It's tough, because the render times are high, while I've gotten used to real-time feedback, from real-time renderes, they can't handle the amount of texture data needed for this project.
|
September 1, 2014 Day 29-30: Been a few weeks since my last post. Landscaping has been kicking my but, and I just haven't had the energy to do anything but be a vegetable. Also, I've run into some major issues with texturing, as I've never textured anything so large, and with so many parts. I was originaly going about it using real time render techniques, but it turns out that the workflow just doesn't work for assets of this magnitude. Took a long time, and many dead ends to come to the conclusion that I need to rethink my strategy, and learn other techniques. This is my progress, thus far. Using Maya and Mental Ray. Still don't really know what I'm doing, nor do I have a clear cut plan, but I was able to set up some nice IBL lighting and am experimenting with MR materials. I'm not used to the lack of control that I normally get from using diffuse, specular, and gloss maps. For the time being, the shaders are pretty basic, only really using diffuse and normal maps.
|
August 3, 2014 Day 29-B: Working on the exhaust, now. Trying to get a believable look, though it's proving to be pretty difficult. So far, I have some general heat discoloration that makes the steel get darker as it gets closer to the engine. I used metal photo reference for the base. I added welding lines and incorporated those into the bump map. Still trying to get the heat discoloration on the welds to look right. Mostly just venturing into the blue hues which are the outcome of the metal being the hottest. Will add some of the other colors in the spectrum tomorrow. Also making the specular highlights pick up some of the color of the metal, as it's a conductive material and should alter the specular color somewhat. Or, at least this is my understanding.
|
|
August 3, 2014 Day 29-A: Finished up the graphics on the rims and front cowling. I also textured the wheels, but I'm not really sure about them. Can't really see in this picture, but I added the writing on the side walls and made a bump map to go along. Used rubber photo texture for it and incorporated it into the specular map as well. I'll probably alter it later once I get a bit further along and see how actual renders look.
|
|
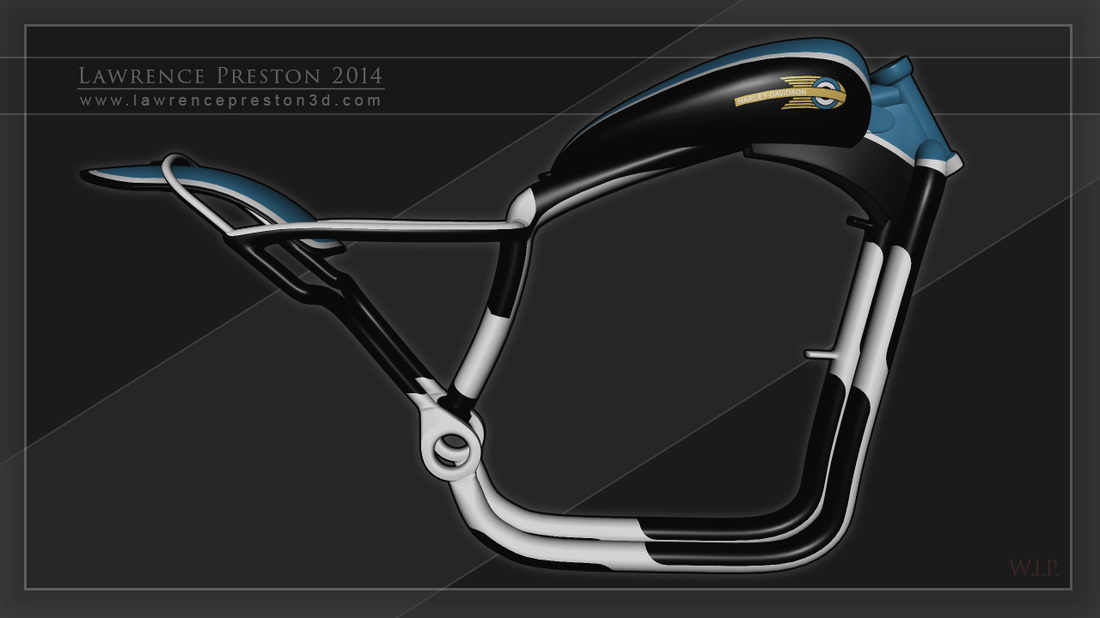
July 25, 2014 Day 28: I'm so glad that the custom paint scheme is almost done with. This has been tough, to say the least. Gives me a whole new appreciation for the people who do actual custom paint on vehicles. As simple as it looks, it's far from it when it comes to applying. I'm also learning a lot about unwrapping UVs as far a strategy is concerned. Even though I thought I was wrapping them with painting in... mind, it turns out that usability took a back seat to hiding seams and minimizing distortion. These are NOT friendly to paint on. utilizing both Photoshop and Mudbox. They both have their strengths and weaknesses when it comes to painting textures. I'm glad that I'm able to incorporate both, and see how using only one technique is very limiting. The best part about this project is that I'm trying my best to recreate reality, so I cant' make decisions based on what is easy, or what I know how to do. It's definitely as good of a learning experience as I hoped.
|
July 23, 2014 Day 26-27: Finished the UVs, but only unwrapping them. I haven't figured out what I'm going to do as far as laying them out. I'm going to need a good layout program in order to do what I want to do. As of now, I have like 7 or 8, 4k maps worth. Seeing that my ultimate plans for texturing this are going to take much longer than expected, I'm going for a much simpler texturing plan, so I get this in my portfolio, and take a break from it. Just going to utilize the necessary Uv, which at the moment is an awful lot on their own. Started texturing the frame, today. This was far more difficult than I had thought, probably due to the way I unwrapped the model. Getting the clean, straight lines was very difficult, as the UVs are NOT straight. I tried to keep the pieces with as few seams as possible, so there s hight distortion that I must constantly fight. Maybe more seems and less distortion would have been a better route, but, I'm not really sure yet.
|
July 18, 2014 Day 25: Well, this took considerably more time than originally expected. But really, just about there. one more day's worth left to go, than I can finally start texturing this. In the future, I'll be investing in a good UV layout program, because this has been a marathon. down to the nuts and bolts, but I'll leave that for tomorrow.
|
|
July 17, 2014 Day 24: Just about done with the UVs. This seems endless... truly an exercise in torture.
|
|
July 16, 2014 Day 23: Still chugging along with the UV's, but almost done! Just a few more unique pieces, than onto the nuts and bolts. Most of them should be similar so can just reuse the same UVs. I'll probably take the opportunity to make some better bolts, too, while I UV them, as some of them are really bad. Hopefully only a day or two left before I can start texturing, I can't wait. I'm really hoping the time spent doing all these UV's is going to pay off, but I really think that it will.
|
|
July 15, 2014 Day 22: Still going to town with the UVs... this is hugely cumbersome. But, at least I got the worst/hardest stuff out of the way. Still so many things left to unwrap...
|
|
July 14, 2014 Day 21: Going through the painful UVing process. I was just going to do the areas that need custom paint and writing, but... I think I may muscle it out and UV the whole thing. I think that it will end up being worthwhile in the end, as I can add textures to everything, as well as bake AO. Worst case scenario, it will be good practice.
|
July 13, 2014 Day 20a: Started playing around with materials to get a feel for how this thing is going to come out. All basic Phong materials, for the time being. Trying to eyeball some basic material separations. There are just so many pieces to this...
|
July 13, 2014 Day 20b: I also began playing around with the UVs. I haven't utilized them, yet. The patterns on the paint are just polygons with separate materials, and will be replace by textures. I just wanted to start getting a feel for the overall look.
|
|
July 6, 2014 Day 18/19: Thought I was going to take a break from it, but I just can't seem to do it. Adding details around the bike
|
|
July 4, 2014 Day 18: Current state, modeling is just about done, now. I'm going around the bike trying to add some of the finer details to really make it pop, and not be so CG looking. Hopefully all the work will pay off once I start texturing it. Getting really burnt out on it, so I may have to take a break.
|

|
July 3, 2014 Day 17: Added the foot controls, pegs, and detailed the rear master cylinder. These were a beast, to model. I never would have guessed that this is how the pegs connect to the bike. I'm not 100% sure about the width, so I'm just going with what feels right, much like with the handlebars. The only problem, is, if they are wrong, there is little I can do but, start over, as the shapes are pretty complicated. Still utilizing clean topology, and that is proving to be really difficult, as all these pieces have circles cut into them. At least I'm getting good practice with doing that, but it's been a nightmare
|
|
June 30, 2014 Day 16: Brake levers, turn signals, and console, added
|

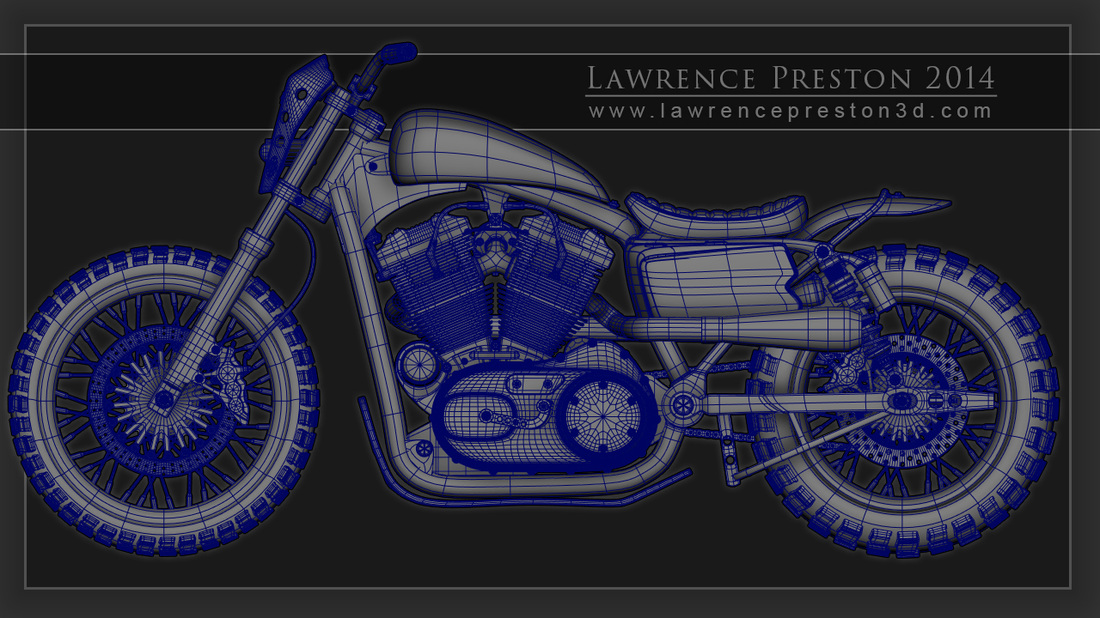
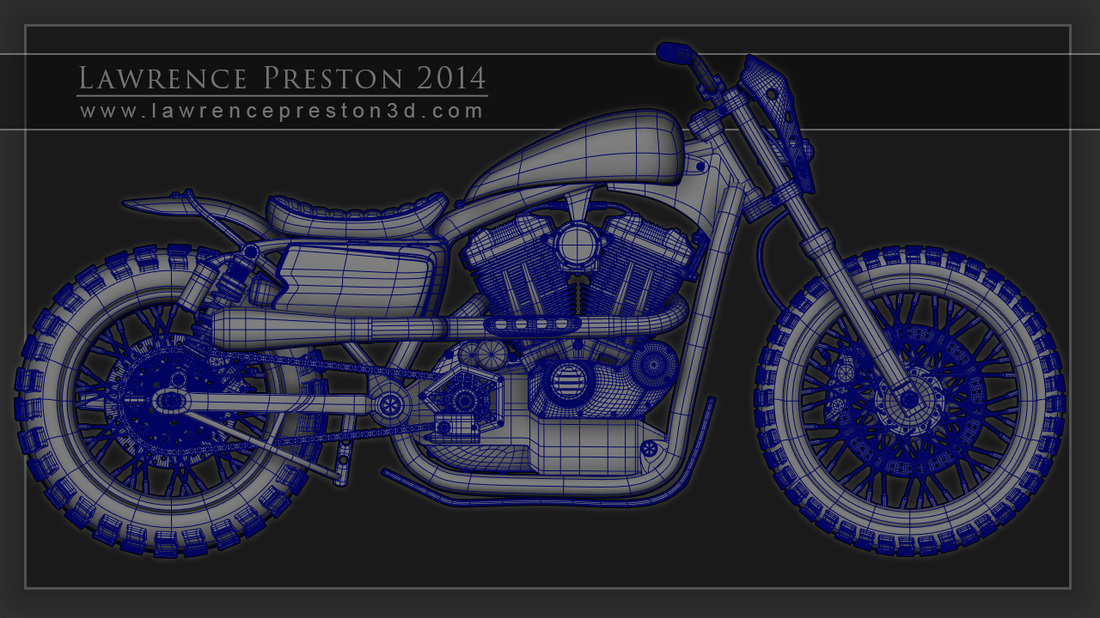
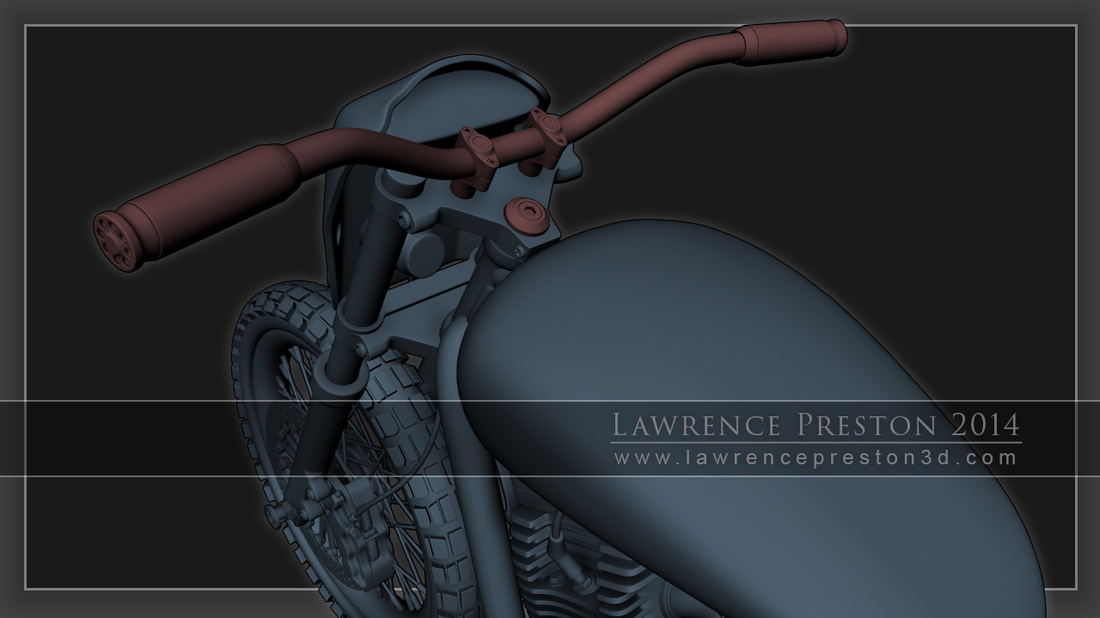
June 30, 2014 Day 15/16: Decided to upload a wireframe, because I'm getting pretty happy with my topology. I'm starting to get very close to modeling the components exactly as they are, which is pretty exciting, to me. Even if really time consuming. Still having trouble figuring things out, as it's hard to find reference images that show these things from all sides.
|
|
|
June 29, 2014 Day 15: Handlebars added. Lot's of tweaking, and remodeling of components around the bike, today. I found a bunch of great pictures of this bike that I hadn't seen, until today. Really helped out a bunch, with areas I couldn't find reference for. Unfortunately, the rear break calipers, are different from the front, so will have to be modeled from scratch. For now, I just used the front ones, because I'm not about to put myself through that torture again, so soon.
|
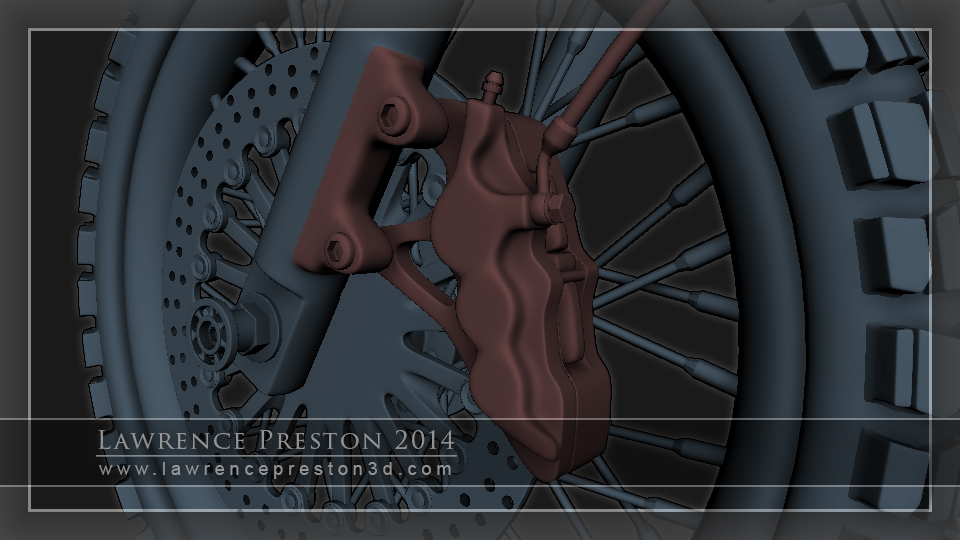
June 29, 2014 Day 14 part 2: I got the break calipers done, late last night, but was too tired to post. I was dreading these, and they did end up being very difficult. But, now that they are done, I think that they are my favorite part of the bike, so far. They have such an interesting shape. I learned a few great extrusion techniques, doing these! (The calipers are made by Performance Machine)
|
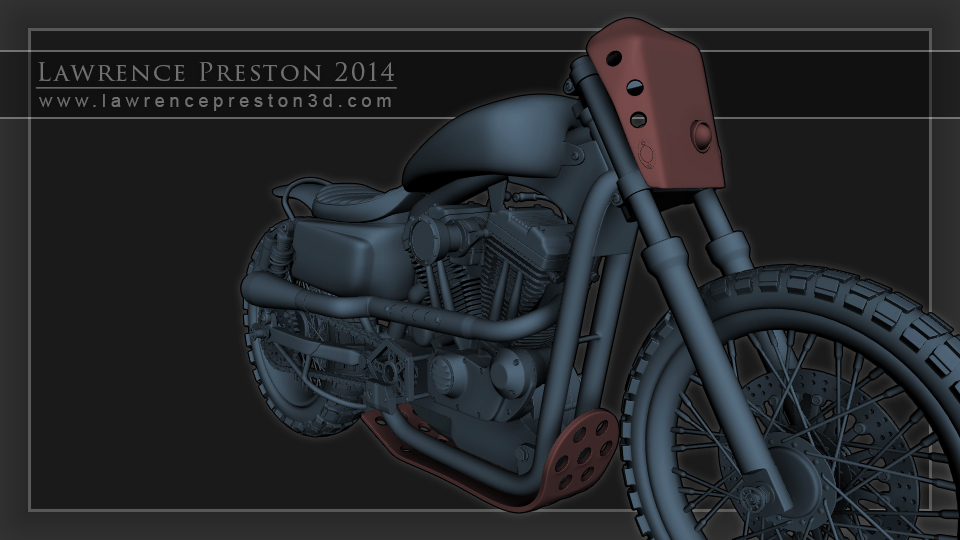
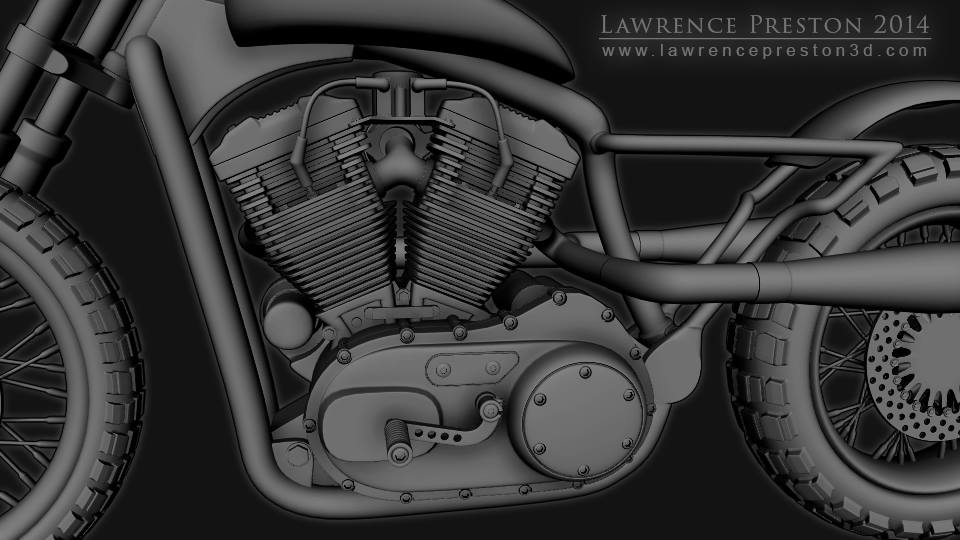
June 28, 2014 Day 14: Two weeks in, and not a heck of a lot left to go. Put in the front cowl, headlight, and underside skid plate. Came up with some interesting ways of handling Boolean operations, that worked out pretty well, for the holes cut into the surface.
|
|
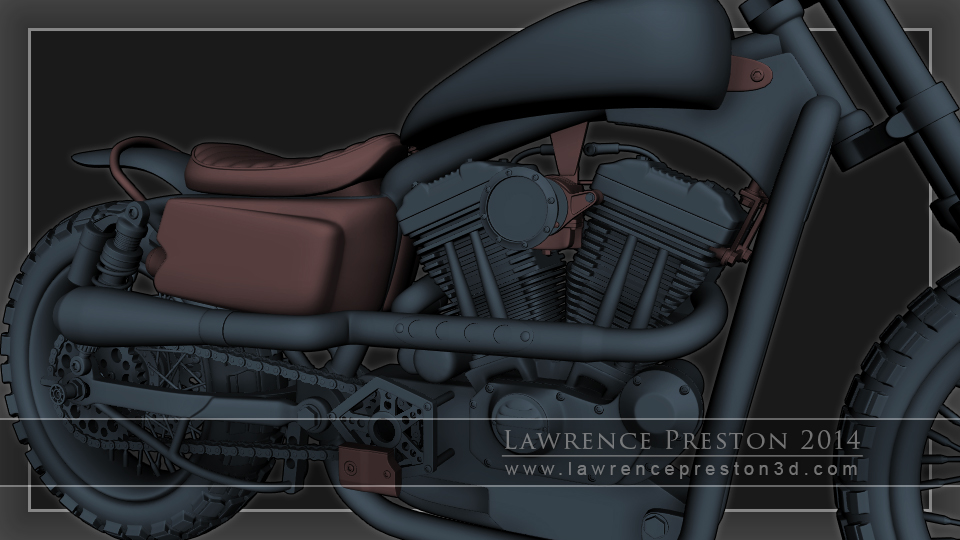
June 28, 2014 Lucky Day 13: Added the seat, cowling, and some other details. I'm getting pretty excited, at this point, as I can finally see the end approaching
|
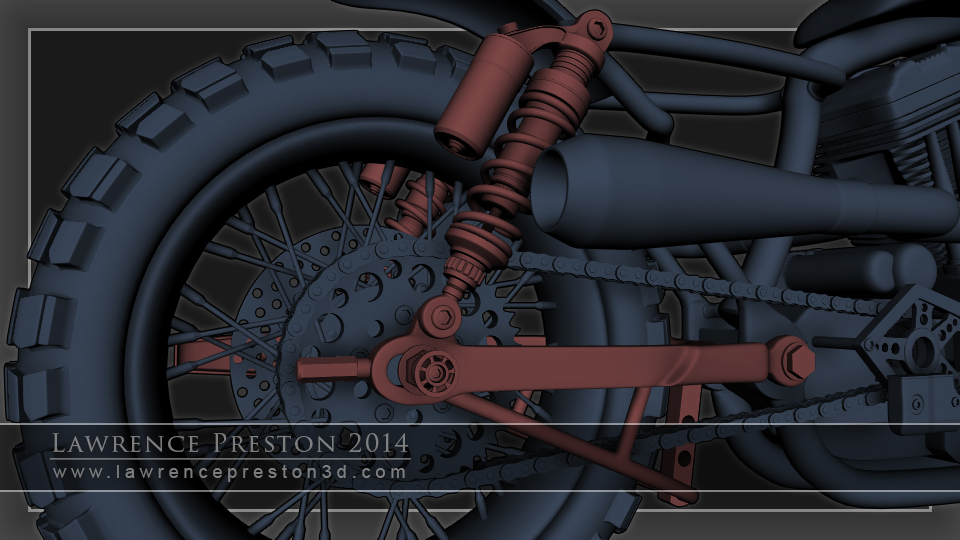
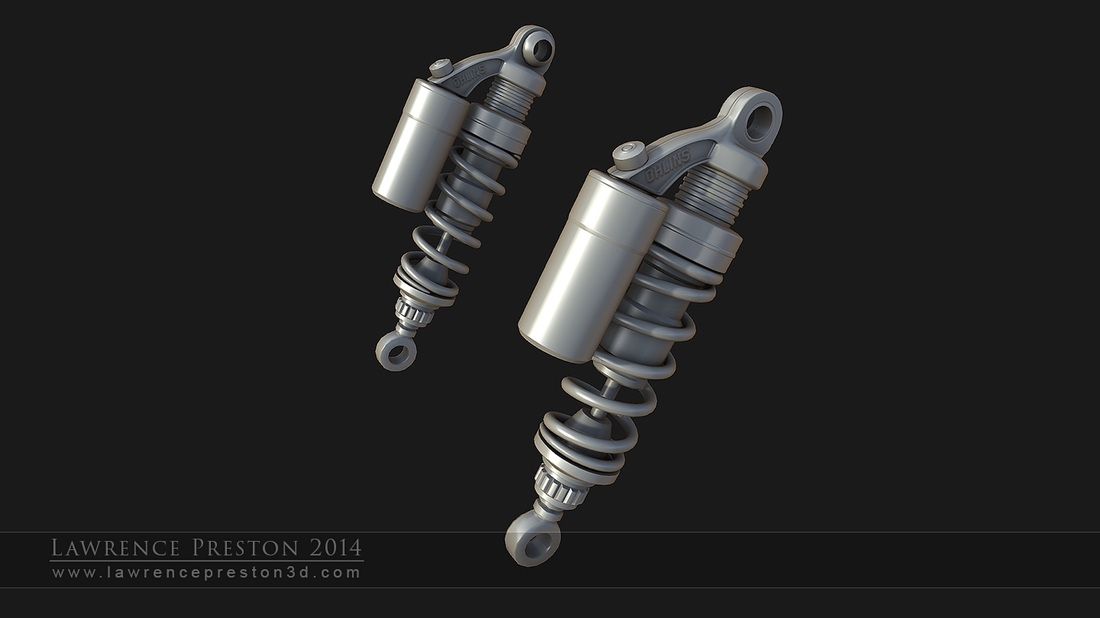
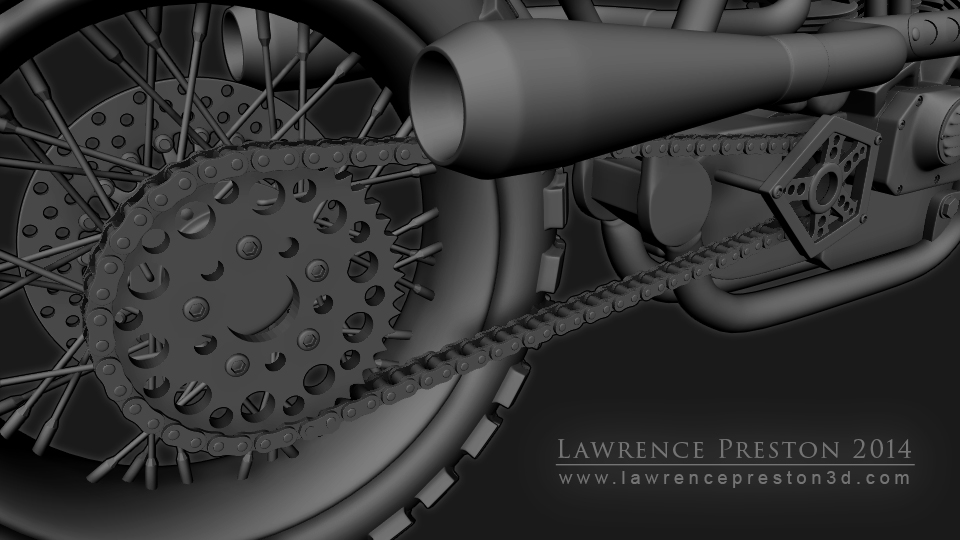
June 26, 2014 Day 12: I finished the swing arm and Ohlins rear shocks. I find it amazing that things are lining up with minimal adjusting. I Only needed to tweak the frame slightly, to get the shocks to line up with the swing arm. However. there is VERY little room for the shocks, between the chain, and the exhaust pipes. I'm not sure how tight a fit, it should be, but hard to judger from the reference images. I'm leaving it for now, in the case that it should be that tight. I'd rather not have to adjust twice. Added a few other details, and adjustments. here and there
|
June 26, 2014 Day 11: Added the drive train. Quickly realized that modeling sprockets and bike chains kinda sucks. I also added some other tweaks here, and there. I'm thinking that I may have screwed up with the rear hub, as in, it may not be wide enough, ugh. If I have to redo the spokes, it's going to be a nightmare
|
|
June 25, 2014 Day 10: Made some tweaks, here and there. Added some spark plugs/wires, mounting brackets, and the shifter lever. I can't get any good reference picture of what is going on at the top of the motor, so I'm kind of winging it (as with many things). Added some other small bolts
|
|
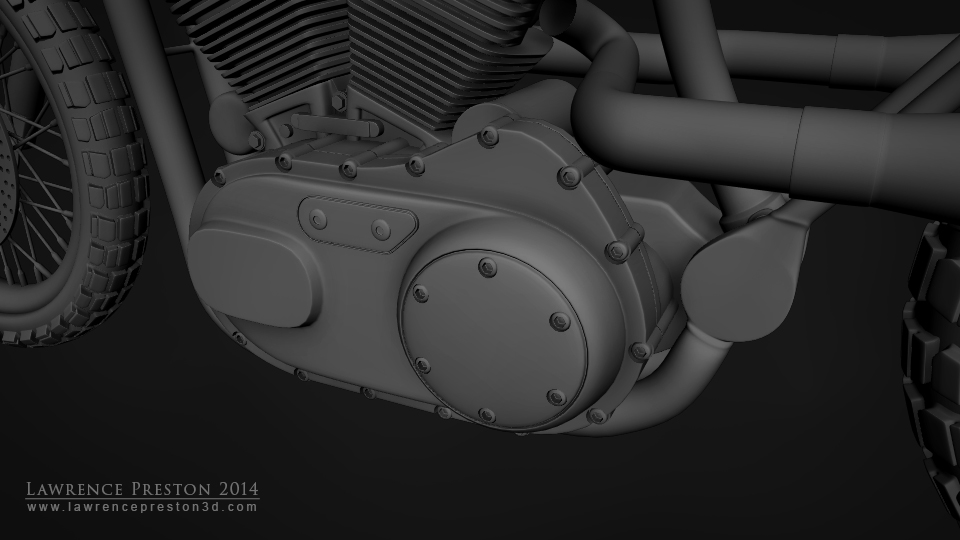
June 23, 2014 Day 09: Added the gear case, and the left side of the engine. A lot of guessing again. It's difficult to get the references and angles that I need. things will most likely need to be changed.
|
|
June 23, 2014 Day 08: It's been months since I've been able to work on this. A little slow to get back into where I left off, but was able to add the intake, and reworked the tires (again), as they just didn't have the feel that I wanted. This time, they should be good.
|